Choosing the Best Web Design Company: A Guide to Success
Introduction
When it comes to creating a strong online presence for your business, having a well-designed and user-friendly website is crucial. Your website is often the first impression potential customers have of your business, so it’s important to get it right. But with so many web designing companies out there, how do you choose the best one? In this guide, we will walk you through the key factors to consider when selecting a web designing company that aligns with your business goals and objectives.
Experience and Expertise
One of the first things you should look for in a web designing company is their experience and expertise. A company with a proven track record and years of experience in the industry is more likely to deliver high-quality results. Look for a portfolio of their previous work to get a sense of their design style and capabilities. It’s also essential to consider whether the company has expertise in your specific industry. This knowledge will enable them to understand your target audience and create a website that effectively communicates your brand message.
Moreover, paying attention to the team’s expertise is equally important. A skilled team consisting of web designers, developers, and marketers will ensure that your website not only looks appealing but also functions seamlessly. They will have an understanding of the latest design trends, technologies, and SEO practices, which are all crucial for a successful website.
Customization and Flexibility
Your business is unique, and your website should reflect that. Look for a web designing company that offers customization and flexibility in their services. A cookie-cutter approach may not be suitable for your business goals and brand identity. The company should be willing to listen to your ideas, understand your requirements, and tailor their services to meet your specific needs.
Additionally, consider the company’s ability to adapt to your changing needs. As your business grows and evolves, your website will need to be updated accordingly. A good web designing company will provide ongoing support and maintenance to ensure your website remains up-to-date and optimized for success.
Communication and Collaboration
Effective communication is key to a successful partnership with a web designing company. Look for a company that values open and transparent communication. They should be responsive to your queries, provide regular updates, and involve you in the decision-making process. A collaborative approach will ensure that your vision is translated into a website that exceeds your expectations.
Moreover, consider the company’s approach to project management. A well-defined process and clear timelines will help you stay informed and ensure that the project is completed within the agreed-upon timeframe.
Conclusion
Choosing the best web designing company for your business requires careful consideration and evaluation. By focusing on factors such as experience and expertise, customization and flexibility, and communication and collaboration, you can make an informed decision that sets your business up for online success. Remember, your website is an investment in your business’s future, so choose wisely.
How to Change or Replace Add to Cart button using Custom Button for a Spacific Category in Woocommerce.
How to Change or Replace Add to Cart button using Custom Button for a Spacific Category in Woocommerce? This question is most common for every WordPress and WooCommerce website user, developer or designer because sometimes we want change the add to cart button to a custom button like “contact us, Read More, Send Enquiry etc.” and we did not know how to change or replace it. Then we check lots of plugins for this type of functionality but some of plugin does not work and some plugin not supported in our website version.
So this post helps everone How to Change or Replace Add to Cart button using Custom Button for a Spacific Category in Woocommerce. Here’s the code below and you can copy it and paste it on your themes function.php file in the last line of your code and don’t forget to remove Php opening (<?php) and closing tag(?>). Use these tags on required places.
<?php
// Change the loop add to cart button by a custom button for specific product category
add_filter( 'woocommerce_loop_add_to_cart_link', 'filter_loop_add_to_cart_link_callback', 10, 2 );
function filter_loop_add_to_cart_link_callback( $button, $product  ) {
    $terms = array('category-slug1', 'category-slug2', 'etc'); // Product categories ( Ids, slugs or names )

    if( has_term( $terms, 'product_cat', $product->get_id() ) ){
        $button = contact_us_replacement_button();
    }

    return $button;
}

// Change single product  add to cart button for a specific product category
add_action( 'woocommerce_single_product_summary', 'action_single_product_summary_callback', 1 );
function action_single_product_summary_callback() {
    global $product;

    $terms = array('category-slug1', 'category-slug2'); // Product categories ( Ids, slugs or names )


    if( has_term( $terms, 'product_cat', $product->get_id() ) ){

        // For variable product types
        if( $product->is_type( 'variable' ) ) {
            remove_action( 'woocommerce_single_variation', 'woocommerce_single_variation_add_to_cart_button', 20 );
			remove_action('woocommerce_single_variation', 'woocommerce_template_single_price', 30 );
            add_action( 'woocommerce_single_variation', 'contact_us_replacement_button', 20 );
        }
//         For all other product types
        else {
            remove_action( 'woocommerce_single_product_summary', 'woocommerce_template_single_add_to_cart', 30 );
			remove_action('oocommerce_single_product_summary', 'woocommerce_template_single_price', 30 );
            add_action( 'woocommerce_single_product_summary', 'contact_us_replacement_button', 30 );
        }
    }
}
// The Function for "Custom Button" replacement
function contact_us_replacement_button(){
    $text = __( "Please Call Store", "woocommerce" );
    // Output
    echo '<a class="custom_call_button" href="#">' . $text . '</a>';
}
?>
Hope this article helps you “How to Change or Replace Add to Cart button using Custom Button for a Spacific Category in Woocommerce.” and You can share this article with your friends so that they not stuck in making this type of functionality.
How to Increase Website Loading Speed and Performance
Website speed and performance are very important for website traffic so that your website can rank on google first page. For example, if you search something on google search then you click on any one of the websites on google search result page.
Then you wait a few seconds for website loading and when it takes more time then you close the website and click on the next website on google search page result. This process runs again and again until the website opens fast and doesn’t take more time in loading.
Best Ways to Increase WordPress Website Loading Speed and Performance
- Check your Website Speed and Performance
- Increase website loading Speed & performance using W3 Total Cache Plugin.
- Optimize and Resize Website Images
Check your website speed and performance
First, you have to check your website speed and performance on GTmetrix or Pingdom Tools and many more website but GTmetrix is a must for testing website speed and performance because GTmetrix is very good for providing website speed and performance data.
Gtmetrix also provides an optimized version of our website images and shows the serve scaled images of our website which is not resized on our website. GTmetrix also shows serve scaled images resolution which is best for images on our website.
So copy your website URL and then paste the URL on the GTmetix website in the enter URL to Analyze section. Then click on test your site button on the right-hand side of the site. Then GTmetrix provides website page speed and performance data.
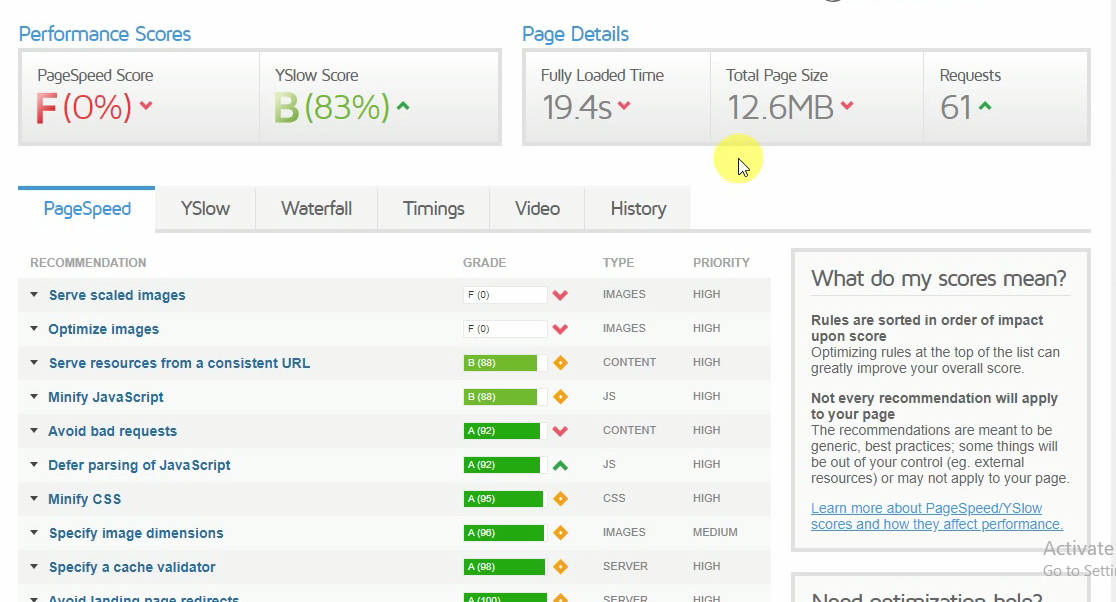
Website Speed and performance data on Gtmetrix
Increase Website Loading Speed Using W3 total cache plugin
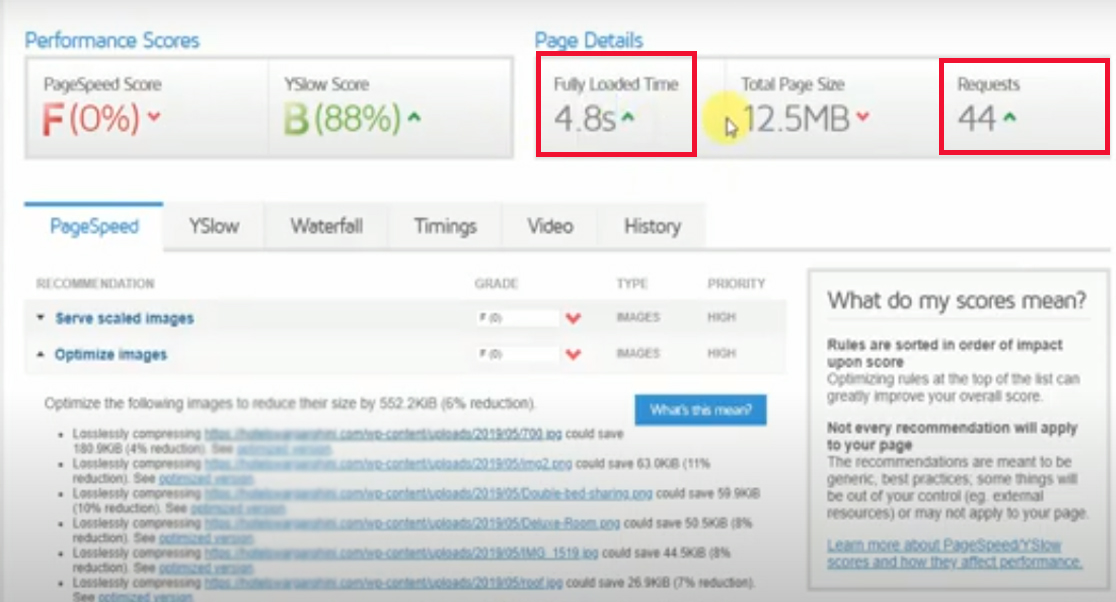
Website loading at slow speed is very harmful to website ranking on google. So, after checking the website speed and performance then download and install the w3 total cache plugin on your website. Then Configure the w3 total cache plugin and after configuring the plugin re-check your website on Gtmetrix.
So, then you show the result of your website, and the full loading time 19.4 seconds is reduced in 4.8 seconds and the request also reduced 61 to 44 after configuring the W3 Total Cache plugin.
Optimize and Resize Website images and Boost Website Speed & Performance
Image optimization and image resizing are must for speed up any website and it’s performance because big size image takes a very long time to load and then the website page also takes a very long time in loading.
Resize and Upload all Serve Scaled Images
So, after W3 Total Cache configuration and re-checking website speed and performance, go on the Serve Scaled images on PageSpeed section in GTmetrix and then open all image by clicking on the image link and download them then resize all images in given resolution ( like 1280×720 to 360×220 ) on Serve Scaled images and save all images in your PC or computer same as the original name.
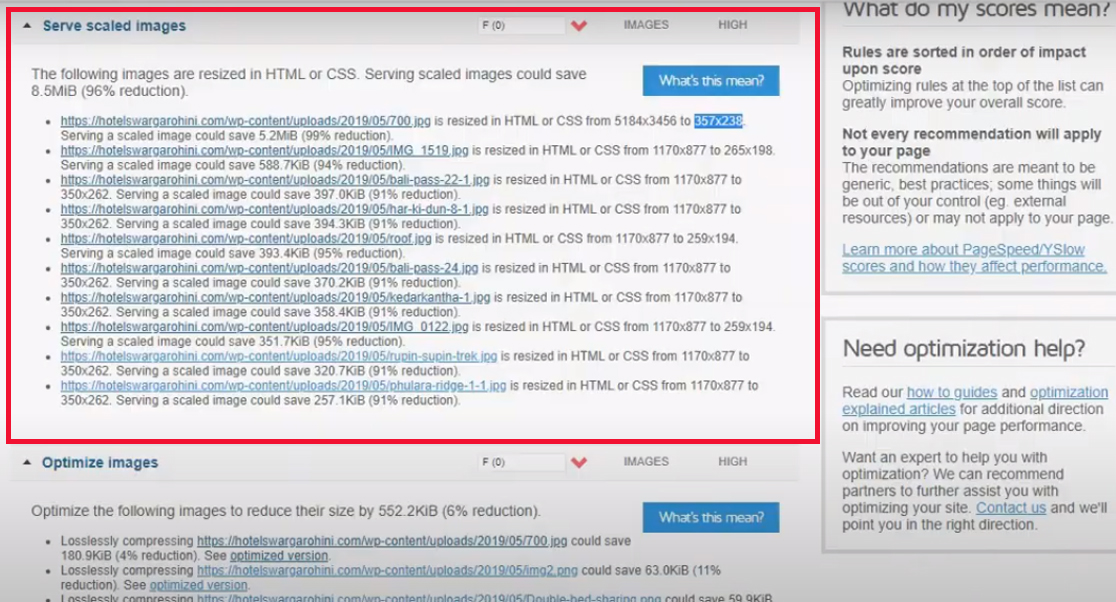
Before resizing Serve Scaled Images
Then open your hosting panel or install the WP File Manage Plugin for image uploading on your site. Then upload all images by following the same path on Serve Scaled Images and you can upload all images by drag and drop and then all images replace by resized images. Then you can check your website speed and performance again on GTmetrix.
You can see the result of website speed and performance, the Website Page Speed Score change 0% to 63 % after resizing all Serve Scaled Images and Total Page Size change 12.5 MB to 4.39 MB.
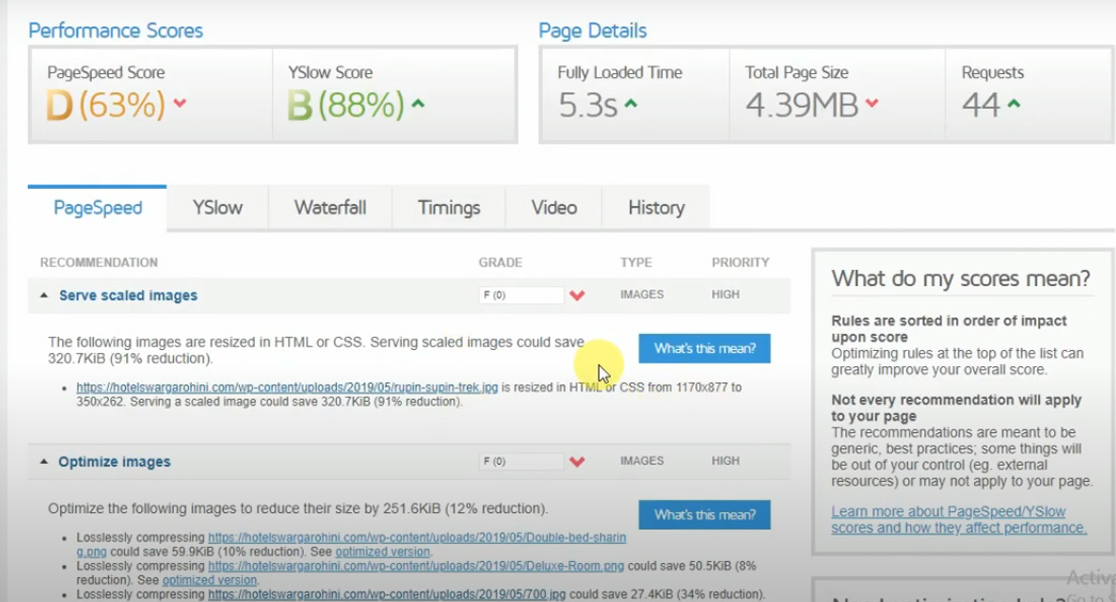
After resizing all Serve Scaled Images
Download Optimize Version of all Images and Upload Again on Your Website
After that go on the Optimize Images and open the optimized version of all images and save all images on your PC or computer the same as the original name. And upload all images on your site by using the WP File Manager plugin or your hosting panel for image uploading the same as the Serve Scaled Images.
So, when all images uploading complete, then refresh your website by clicking Ctrl + F5 or purge all cache by clicking on top header performance menu in your WordPress Website admin dashboard. And then check your site again on GTmetrix.
After Optimizing all Images on GTmetix
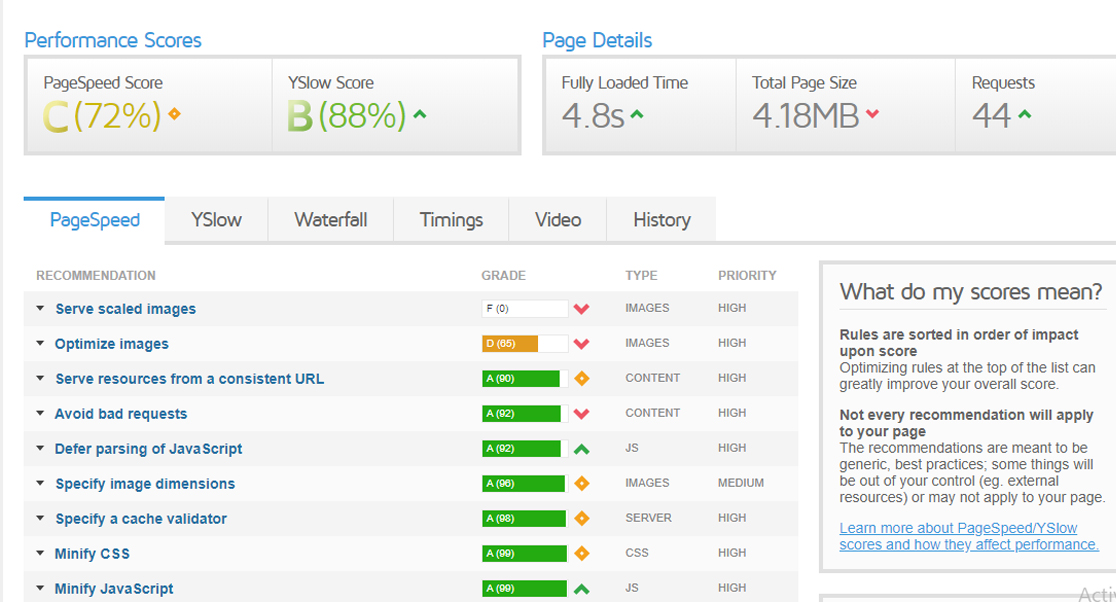
Then you can see the result of your website on GTmetrix. The Page Speed Score changed 63% to 72% and Total Page size changed from 4.39 MB to 4.1 MB and the website fully loaded time is 4.8 second.
So, now you will all understand how to increase website loading time and how to reduce the total page size of your website. You also know here about how to resize website images and how to optimize website images without a plugin.
How to Fix Error Establishing a Database Connection” in WordPress
Many beginners face the “Error Establishing a Database Connection” when they are working on the WordPress website. After that, they try their best to correct this error from themselves, but even after many times, they do not succeed. Because they didn’t know how to fix this type of error? They are irritated by fixing this error many times but the didn’t succeed.
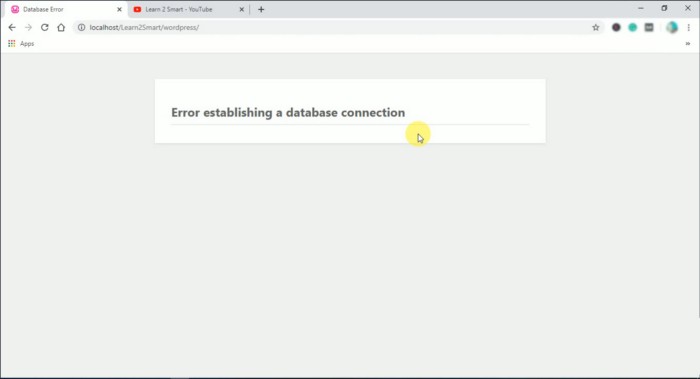
If you are irritating from seeing this error on your WordPress website and you need to know about how to fix this error in a simple way. So firstly you have to know about what is “Error Establishing a Database Connection”?
Also, Read About — How to Increase Website Loading Speed and Performance?
What is “Error Establishing a Database Connection”?
Error Establishing a Database Connection is a common WordPress error. which means that your database is not connected to your WordPress website.
So, the database should be connected to your WordPress website for fixing this error. The MYSQL database is not connected to your website because the login credential of your MYSQL database is not correct and you should correct it then the error will be fixed.
Why Error Establishing a Database Connection is occurs on a WordPress website?
This error occurs many times when you are beginners and the main reason for occurring this WordPress error is your database connection not established. That means When your Database is not connected to your WordPress website then this error occurred.
The time of arrival of this error is not fixed this error can occur at any time but mainly this error occurs at 2 times —
- During WordPress Installation
- During WordPress Migration
During WordPress Installation
The Error establishing a database connection occurs when you install the old version of WordPress on your server then this error occurs in your WordPress website.
So you have to download a fresh WordPress Version and then install it on your web server or localhost (Wamp Server or Xampp Server).
During WordPress Migration
When you migrating/transferring/moving your WordPress Website one server to another server or one host to a new host then maybe this error is occurred. If you have not migrated/transfer/move WordPress Website properly and you didn’t connect the new host database to your WordPress website. So then this error occurs.
How to fix “Error Establishing a Database Connection in WordPress?
Fixing the Error Establishing a Database Connection is very simple and we describe with 2 very easy and simplest way-
- Check and correct the Login Credentials of your MYSQL Database in the wp-config.php file.
- Backup and Delete the wp-config.php file.
1. Check and Correct the Login credentials of your MYSQL Database in the wp-config.php file.
When you face “Error Establishing a database connection” on your WordPress website and you have to know the idea about then what you should do that time?.
So you have to check login credentials in the wp-config file on your hosting panel (or wamp and xampp) root directory.
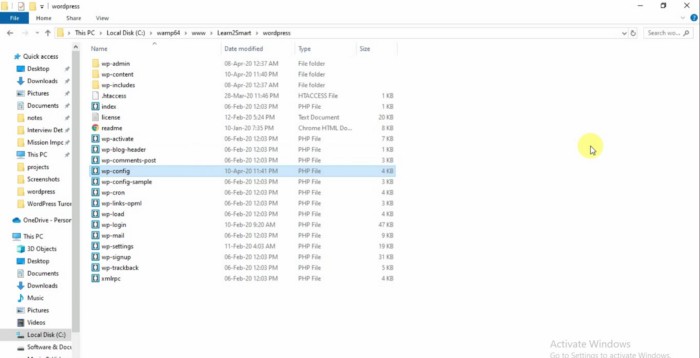
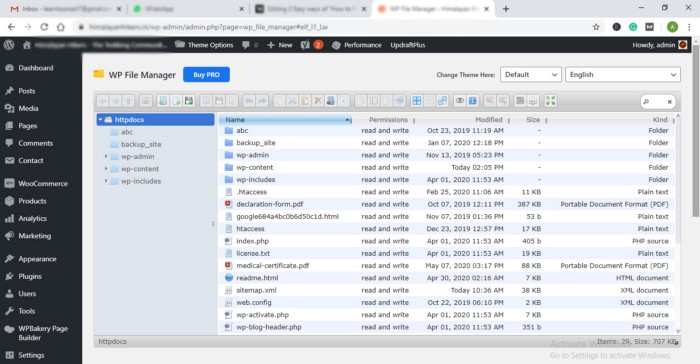
If you have not to get in touch with your hosting panel then you can download and install the WP File Manager Plugin for accessing your website files and folders
Make sure the login credential of your database is correct in wp-config.php file. So go to your hosting panel ( or wamp/ xampp) root directory and download or backup the wp-config.php file and open it and then check the login credentials of your database.
So, check login credential of your database in the wp-config.php file, these areas below —
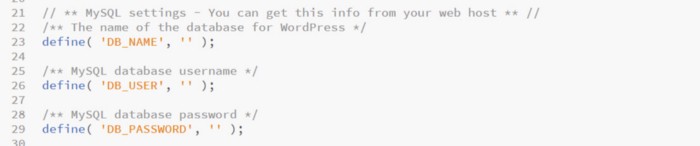
If these login credential of your database is not correct then correct it by checking on your hosting panel database section and if you are using localhost Wamp server or Xampp server then the login credential is: Database name- “Your Database Name”, Username -“root” and Password — “”(nothing).
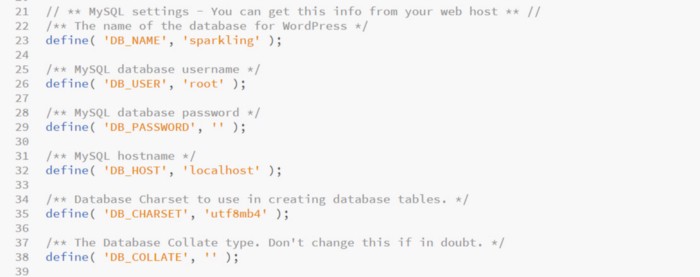
Here is MYSQL Database password is nothing because in localhost (xampp or wamp) by default the MYSQL Database password is nothing.
You can check your database name in your hosting panel database section and if you are using local server Xampp or Wamp, then you can go to localhost/Phpmyadmin for checking your database name of you database.
When you correct the login credential of your database in wp-config.php file then save it and then refresh your website by pressing ( Ctrl + F5 ) key of your computer or laptop keyboard.
After that you can see the error establishing a database connection is fixed and your Website run correctly.
2. Backup and Delete the wp-config.php file.
This is the very simplest way to fixing the Error establishing a database connection in WordPress Website.
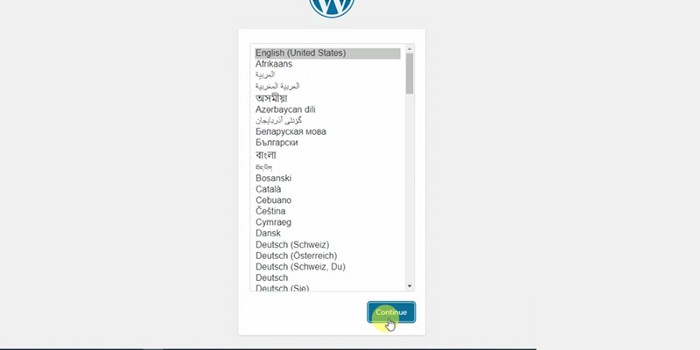
So if you seeing this error on your WordPress Website then you go to on your hosting panel root directory and download and backup the wp-config file on your computer system. After that delete the wp-config file from the hosting panel (or Wamp or Xampp) root directory.
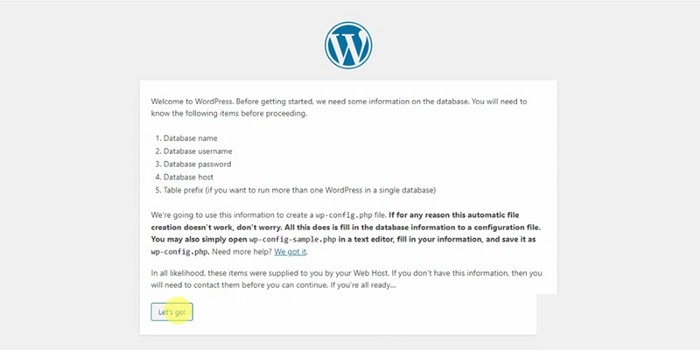
And then refresh your website by pressing ( Ctrl + F5 ) button of your computer or laptop keyboard. After that you see the installation process of your website, so don’t worry select the language and then click on the continue button.
So, After pressing the continue button you redirect the next page and there is some information about your database that you will need to know and then press the let’s go button.
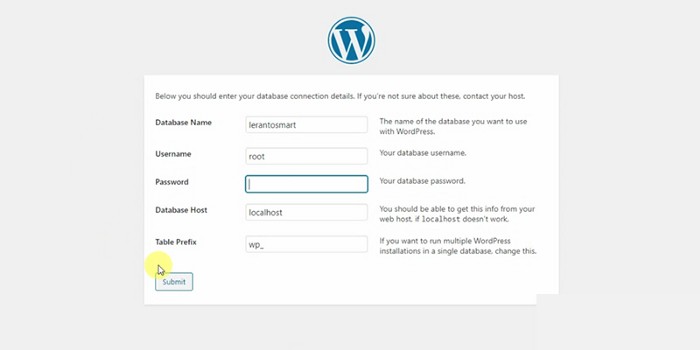
And, then the next window open where you should fill the database connection details and then click on the “Submit” button.
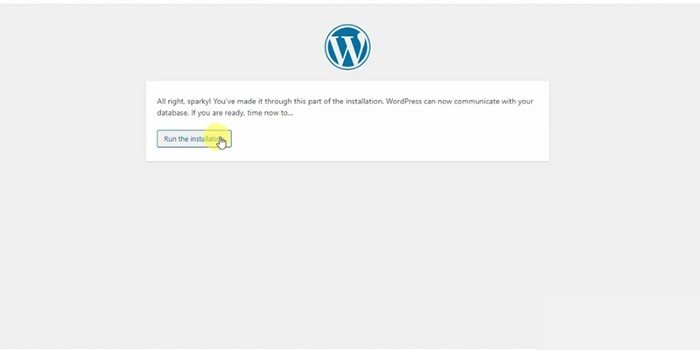
So now you redirected to a next window where you should click on the “Run the Installation” button.
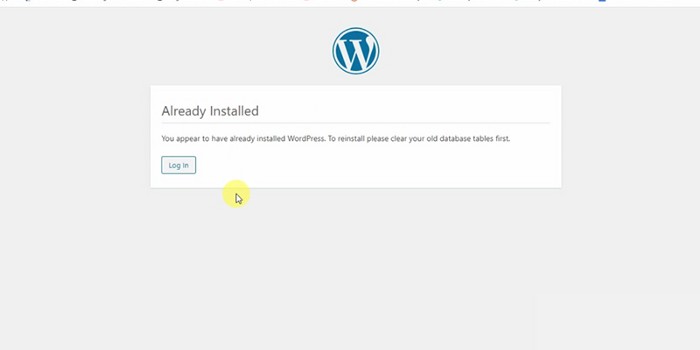
After that, you got the “Already installed” message in the next window because you installed your WordPress already and then you click the login button.
So, the Error establishing a database connection is already fixed and you can log in here for accessing your WordPress admin dashboard.

If you didn’t log in to your WordPress admin dashboard right now so you can skip this and go to your website and refresh it by pressing the ( Ctrl + F5 ) key of your computer or laptop keyboard.
So then you see your website is running properly and the error is fixed now.

The Error Establishing a Database Connection is fixed now.
So, now you all understand about the WordPress common error the error establishing a database connection and how to solve or fix it without any problem.
These 2 steps are very efficient and 100% practical, easy, and guaranteed way for fixing or solving the error in WordPress.
So try these 2 best easy ways on your website and solve or fix the error quickly. Then tell about this post how you like it and please comment, Is this post helpful for you?

